Back in the Olden Days people didn’t move around much, and the place where you lived was as much a part of your identity as your name.
In the old birth, marriage, and death records I have been studying from the Carpatho-Rusyn village of Rozdziele (where some of my ancestors came from), it is evident that keeping track of an individual’s identity was of the utmost importance to the parish priests whose beautiful penmanship adorns these registers. But in a village of 400 people with only a handful of surnames, and where almost everyone is named John, Mary, Peter, or Onuphrius, how on earth do you differentiate one John Tylawsky from the next?
One remarkable thing about all these parish records is that they carefully record the house number (Domus Numerus) where the principal actors lived: the house where a birth or death happened (there were no hospitals, of course; everyone was born and died at home), and the house where each party to a marriage lived (at first just the groom’s house was recorded, but starting in 1847 the bride’s was too).
More often than not, the house number is essential for identifying and differentiating people with similar names, and with the house number, you can get an idea of how family alliances form and change over time.
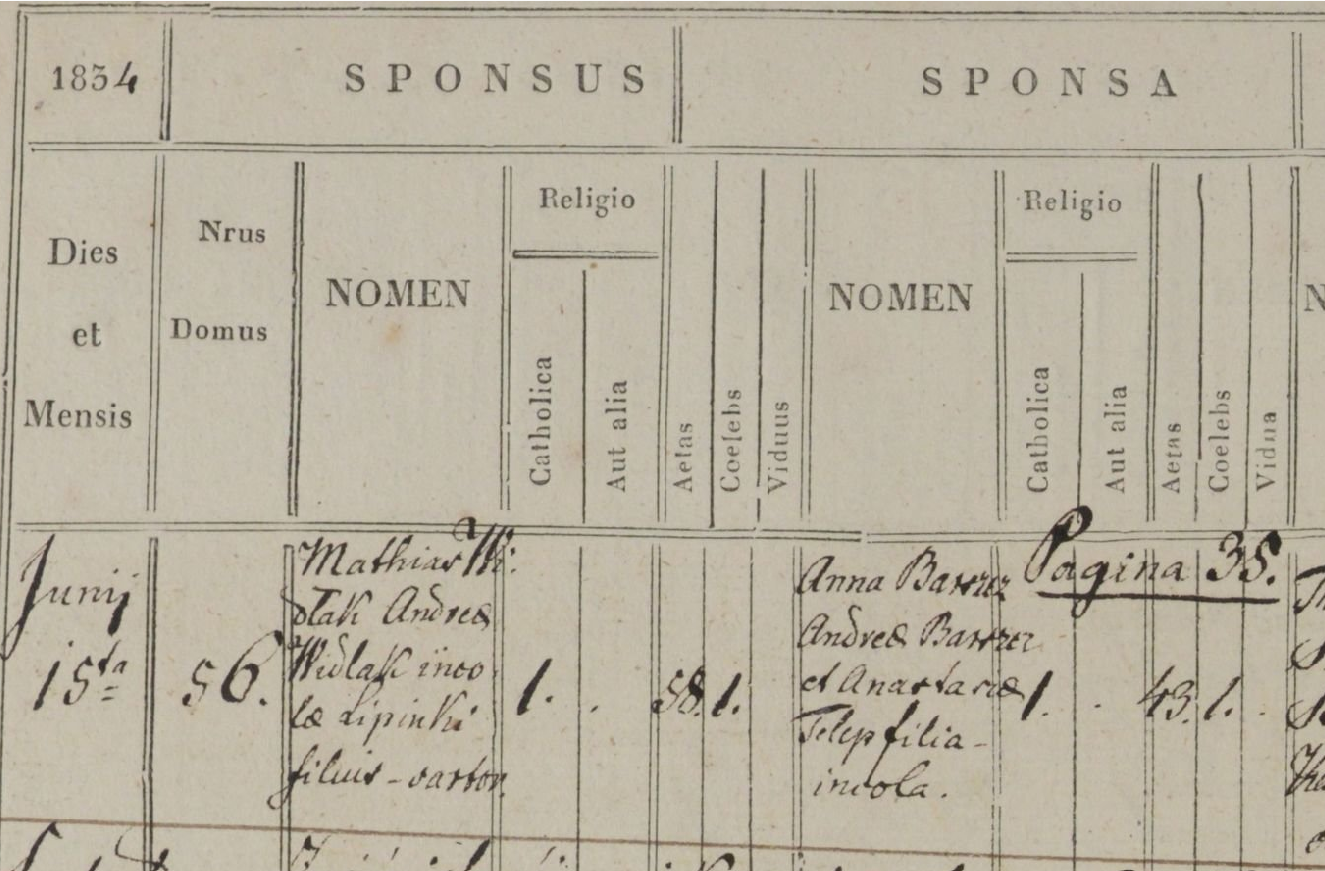
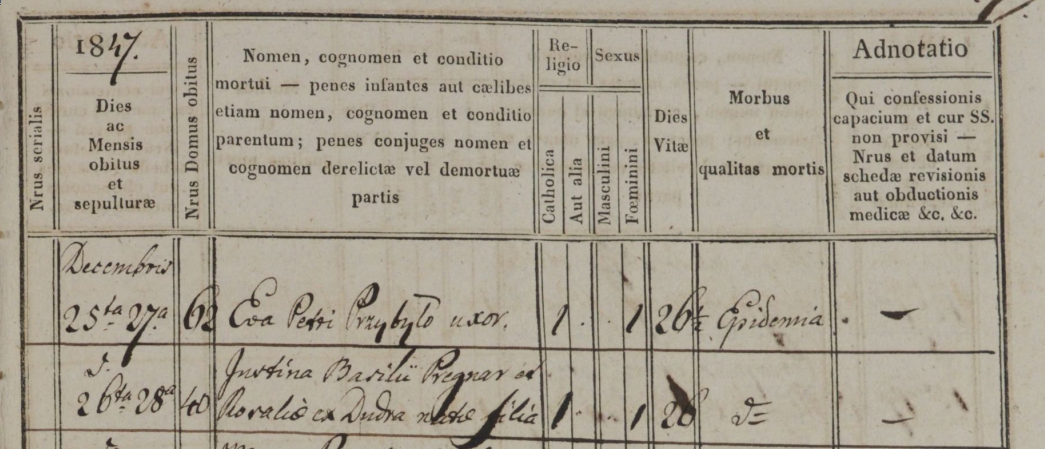
Here is a sample death record for the purpose of illustration. The column to note is Nrus Domus obitus, “House Number of the deceased”. Birth and marriage records have a similar column. The clerk typically tried to pack as much family information into the record as possible so as to remove ambiguity, e.g. in House 62: “Eva, wife of Petrus Przybyła” and in House 40: “Justina, born the daughter of Basilius Pregnar and Rosalia, formerly Dudra.” Both died of “Epidemia”. More about this later.
This House Number was not a street address, exactly. As each new house was built in the village it was assigned a serial number that had no logical connection to its location as modern addresses do, although the building of houses did tend to follow the general expansion of the village over time, and the house numbers tend to increment along those lines of expansion.
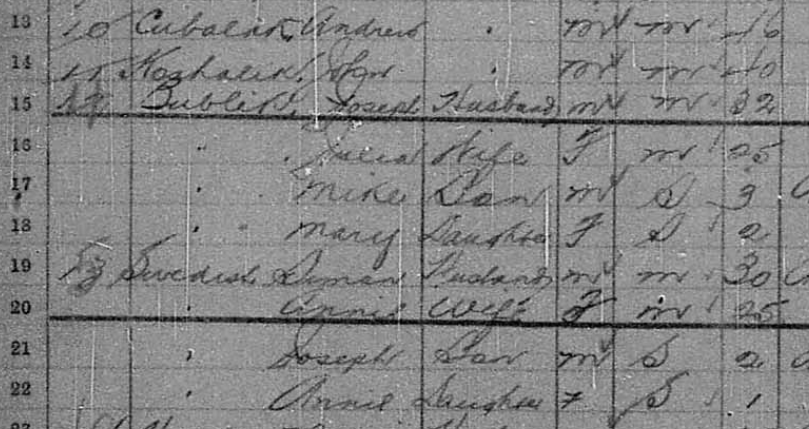
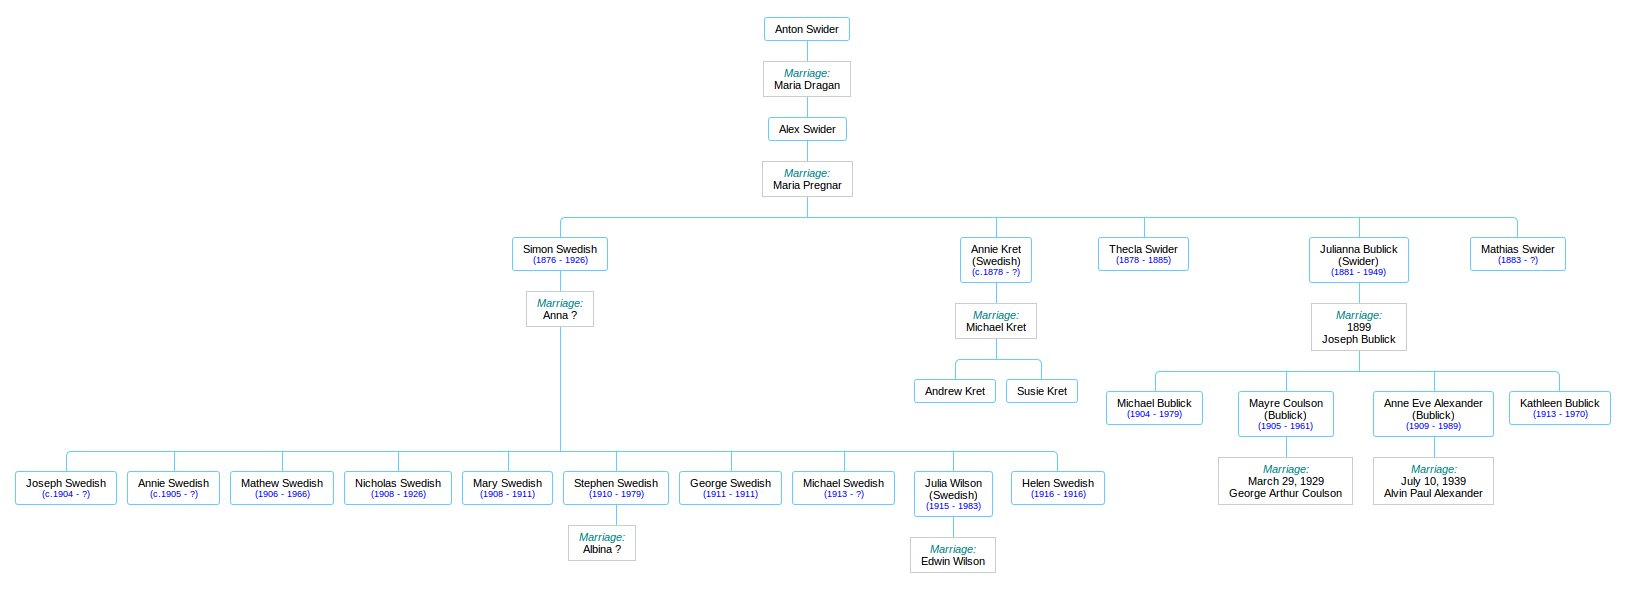
As I was researching the family of my great-grandmother Julia (see Julia Swedish was not Swedish!) I discovered two house numbers in particular that showed up again and again, and when I started enumerating the multitudes that these houses held across the decades, I realized that the houses themselves had stories to tell.
I’ll begin with House 40, the birthplace of Julia’s mother (my great-great-grandmother), Maria Pregnar. Maria was born there in 1842, but before we get to that point we have a bit of time-unraveling to do first.
The records I have begin in 1784, and they document the births, deaths, and marriages that took place in the four villages that comprised the Greek Catholic parish of Męcina Wielka: Rozdziele, Wapienne, Pstrążne, and Męcina Wielka itself.
The Greek Catholic Church, formerly called Uniate, was an interesting hybrid that arose out of the ancient East-West schism of Christianity. It used the forms of the Eastern Orthodox communion, and showed outward similarities to the Russian Orthodox Church, but it acknowledged the supremacy of Rome.
1784-85 was an important year in Rozdziele, because it saw the building and dedication of its own church, The Church of the Nativity of the Blessed Virgin (or Maria Geburt in the language of their new Austrian overlords). This new church, so close to home, would have allowed the residents of Rozdziele to attend mass in their own village, rather than having to travel 2.5 kilometres to the main parish church in Męcina Wielka.
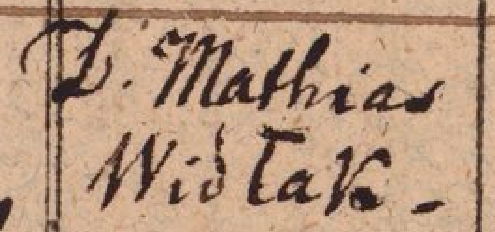
The first knowledge I have of House 40 is the record of a marriage that took place on July 21, 1784. It is, indeed, the first marriage in the entire parish that these records report, and it may well have been the first marriage that was solemnized in the brand-new Maria Geburt church. It was the marriage of one Grzegorz (Gregory) Mizik, from the nearby village of Wapienne, and Agata (or Agaphia) Kunca (pronounced KOON-tsa). Bride and groom are both quite old– Agata is 50, and Grzegorz is almost 25 years her senior. The details of their past are lost to me, but this was not the first marriage for either of them.
The first marriage celebrated in Rozdziele after the building of the new Church of the Nativity of the Blessed Virgin was between Gregorius Mizik from Wapienne and Agaphia (Agata) Kuncicka. Kuncicka is the feminine form of Kunca.
From other records I managed to piece together a bit of the story. I surmise (please note that much of this paragraph is based on inference and circumstantial evidence) that the original inhabitant of House 40 was one Andrzei (Andrew) Kunca, and Agata was his wife. He died sometime prior to 1784, leaving no son to inherit the farm, but they had one daughter, Anna, born about 1732. The widow Agata married the elderly Grzegorz in 1784 and then followed him to his home in Wapienne, where they lived out the rest of their days– Agata dying just a few years later, in 1788, and Grzegorz living until 1797, dying at the ripe old age of 93.
If I am correct about this reconstruction, then Andrzei and Agata Kunca would be my… let’s see… great-great-great-great-great-great-great grandparents.
Andrzei was doubtless a serf, meaning that he was not free to move about and choose his own occupation or employer, and he was obligated to spend a certain number of days each year working the farmland of the local Polish landlord. Andrzei would have been born in the early decades of the 18th century. I don’t know when he died, but he may have lived to see the First Partition of Poland (1772), when his homeland went from Polish to Austrian rule.
I should note that even though I am using the Polish versions of given names here, the people I am writing about had a national identity that was definitely not Polish. German-speaking Austrians ruled them from far-off Vienna, Polish aristocrats owned most of the land, and Polish was the language of law, school, and government bureaucracy, but the people thought of themselves as neither Polish nor Austrian. The government authorities referred to the rustic farmers occupying the north slope of the Carpathian Mountains as Rusyn (Ruthenian), and the language they spoke amongst themselves was an ancient dialect of what we now call Ukrainian.
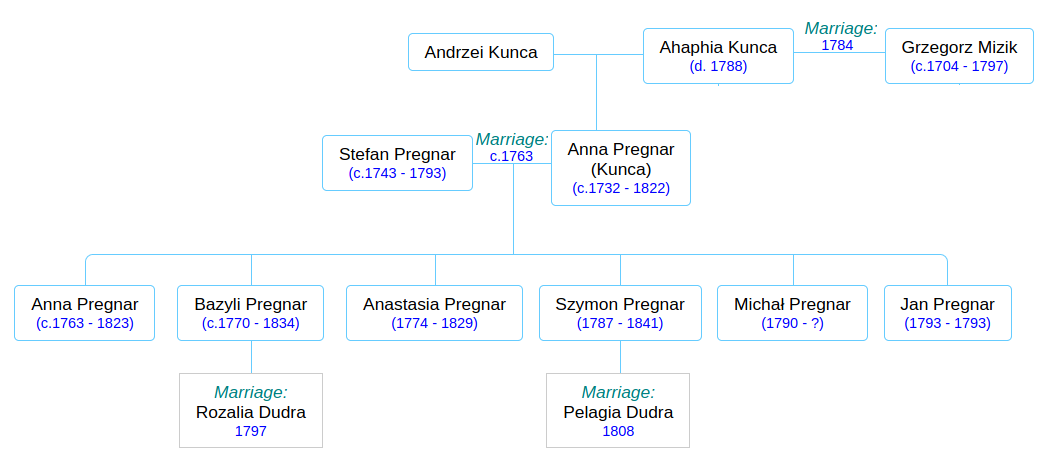
But Anna, waving farewell to her “newlywed” mother Agata and old Grzegorz as they shambled off down the road to Wapienne, was not left alone in that house! Even though the records do not speak directly of it, she had, years before, married a young man and brought him into the house, perhaps as early as 1763, and they started a family of their own. This young man’s name was Stefan Pregnar, and he came from a family that appeared to be well established in Rozdziele by the mid-18th century. The Pregnar name will thrive in Rozdziele in the coming century, while the Kunca family name will vanish from the record-books within a few years.
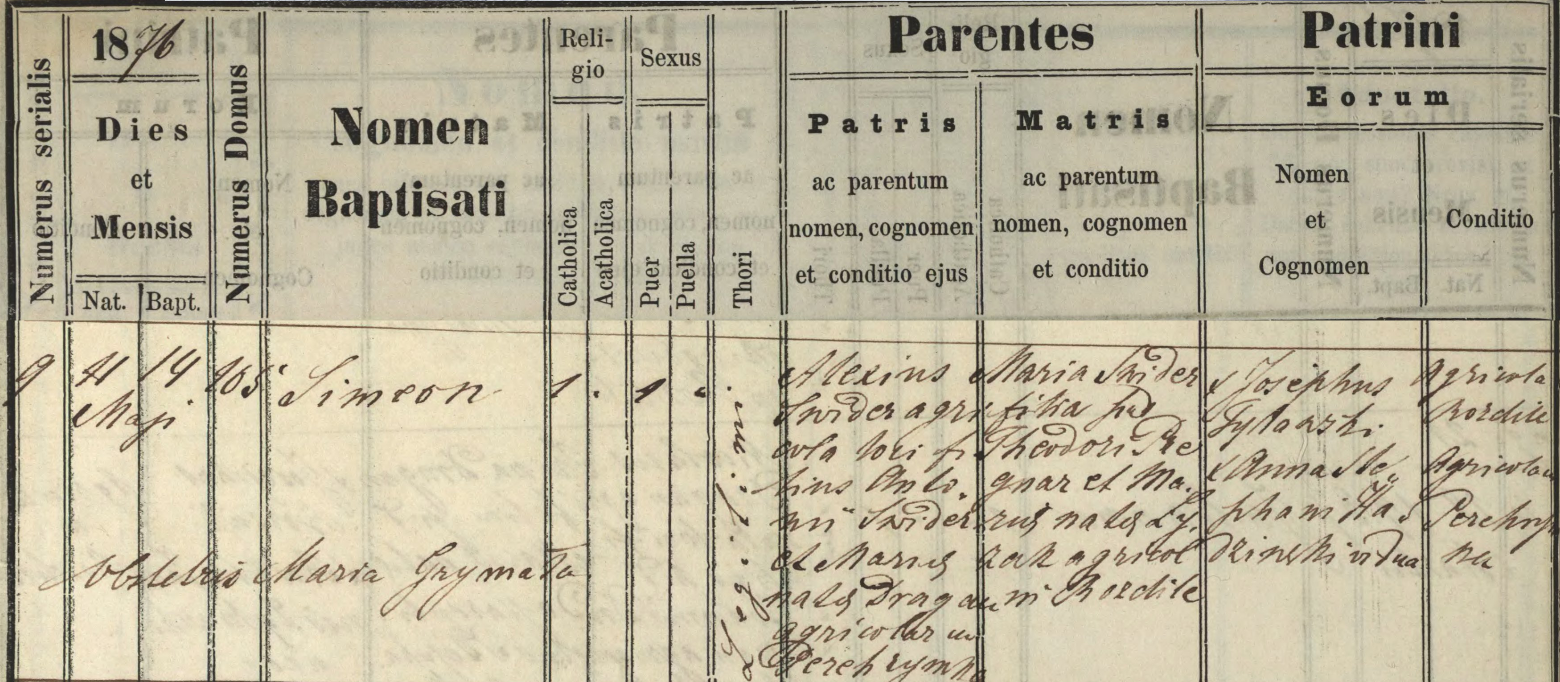
I know about Stefan because the next concrete event I have, which ties House 40 to a verifiable ancestor of mine, is the record of the birth of a boy, Szymon (Simon) Pregnar, in 1787. His parents are Stefan Pregnar and Anna Kunca, daughter of Andrzei. Stefan and Anna are my direct ancestors. Stefan’s eldest daughter was born (this I know from her registration of death) about 1763, so I am guessing that 1763 must have been about the time that Stefan and Anna got married and Stefan moved in and took over management of the farm from his in-laws, Andrzei and Agata Kunca. There is no record of the births of Stefan and Anna’s first three children– Anna, Bazyli (Basil), and Anastasia– because they were born before record-keeping began in 1784, but I have no reason to suppose they were not all born in that house and grew up there.
The Polish-Lithuanian Commonwealth, once the largest, most powerful state in Europe, had sunk into irrelevance. It became an object of interest to its neighbors, which were competitive, aggressive, and hungry for land.
The year 1772 was a traumatic one for the Commonwealth, because in that year the great powers of Austria, Prussia, and Russia colluded to take large chunks out of it for themselves. Empress Maria Theresa of Austria was reportedly distraught at this dismantling of Poland, and she wept at what Russia and Prussia were doing… but she took her share nevertheless. As the Prussian king Frederick joked, “She wept as she took, and the more she wept the more she took.” The portion she took became the Austrian crown land (province) of Galicia, which survived until the end of World War I.
While the change from Polish to Austrian sovereignty in 1772 probably had little immediate impact on the farmers of Rozdziele, the long-term historical implications would be vast.
1793 must have been a tumultuous year for the Pregnar family. In February, Stefan died at the age of 50. At that point he and Anna had a fairly large family: their two daughters, Anna (then 30 years old) and Anastasia (19) will never marry and will live out their entire lives in that house. The eldest son Bazyli (23) was no doubt thrust suddenly into the role of head-of-household upon his father’s death. Stefan also left two young children, the afore-mentioned Szymon (6) and Michał (3), and a few months after Stefan’s death, in June, another son, Jan, was born, who will live for just 11 days.
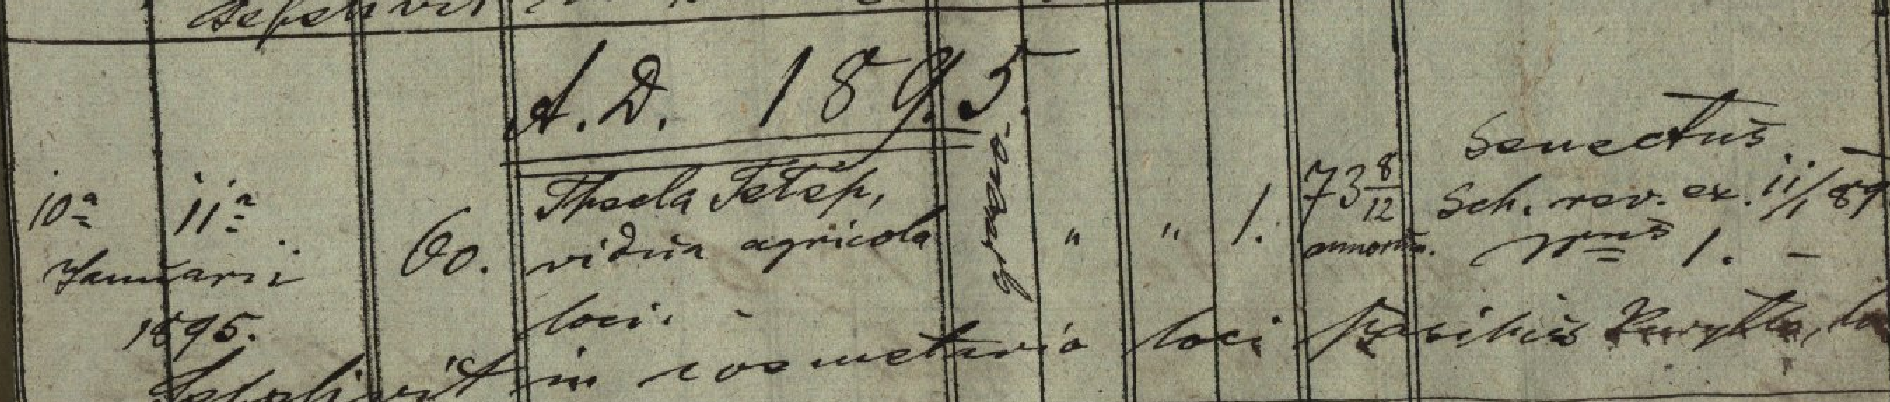
Why did Stefan die? His cause of death as listed on his death registration is no help at all. Ordinaria, Latin for “an ordinary death”, is used with maddening frequency in these death registers, along with Naturalis, “natural causes”. Sometimes it appears that the priests are using these terms to mask their lack of medical knowledge, and it might have been more honest of them to simply write down “Sorry, I don’t know why, he just died, that’s all.” Sometimes, when there is a cluster of deaths called Ordinaria and Naturalis that take place within a short period of time, it is pretty clear that there is either a famine or an epidemic taking place. It appears that something like this may have been going on in 1793, because the number of deaths from “Ordinaria” was up almost 400% from the previous year.
What about little Jan, who died shortly after Stefan? There is something peculiar about Jan’s brief life. I know from Anna’s death record (she died in 1822 at the age of 90) that she must have been born around 1732. But that means she would have been over 60 when she gave birth to Jan! That stretches the boundaries of belief, and anyhow, given the state of medicine in those days, giving birth at such an advanced age would have been a virtual death sentence for Anna…
Perhaps there is a simple explanation, although one which Stefan would not want me talking about here in public. Stefan himself was getting on in years, and with only one son of an age to help him on the farm, he probably hired young men as live-in farm hands. Stefan’s 19-year-old daughter Anastasia may well have become an object of affection for one of the farm hands, and rather than go through the embarrassment of declaring an illegitimate child, the baby was simply declared as Anna’s.
These birth registers, by the way, are full of illegitimate children, and it’s a stigma that followed a person through their entire life. It was, in all likelihood, very important to avoid the stain of bastardy at all costs.
(Maybe I shouldn’t ask too many questions, but if you take a look at Anna’s age at the birth of her other two youngest children– 57 when Michał was born, and 54 at the birth of Szymon– you may be forgiven if you raise your eyebrows and go “hmm”.)

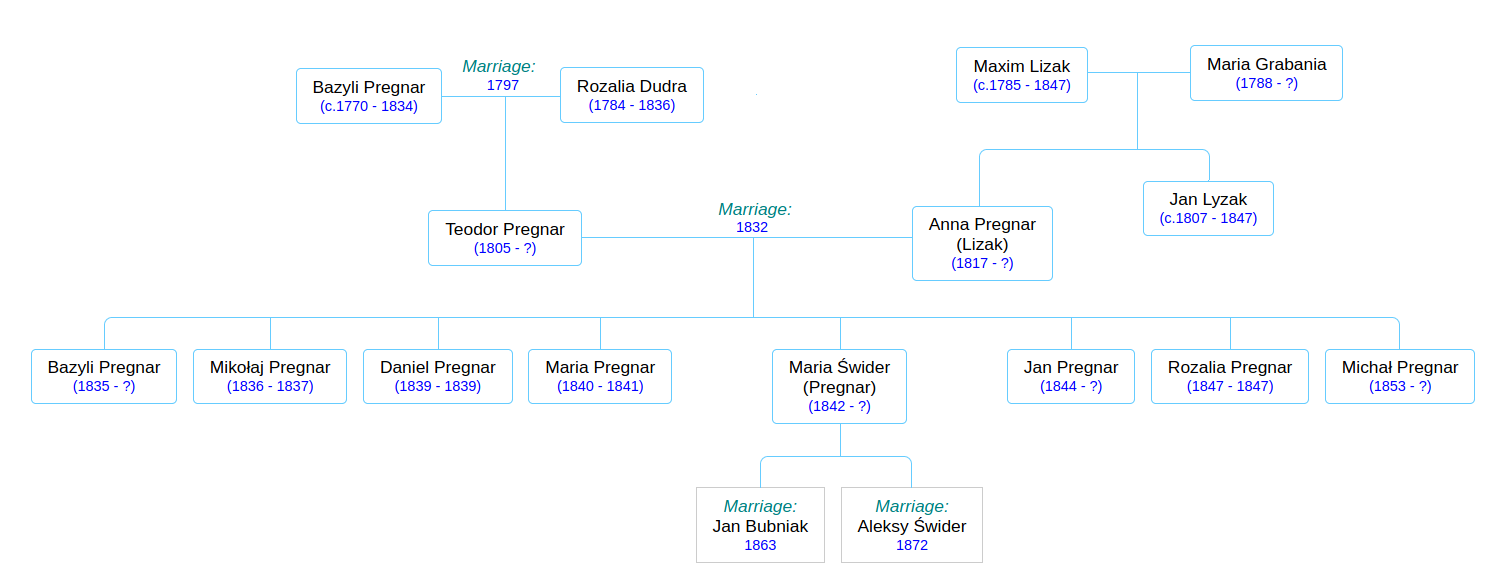
Pregnar family tree. Stefan and Anna’s generation.
Laying aside my speculation about the parentage of Jan and Michał and Szymon, here is the “official” family tree, as we have it thus far:
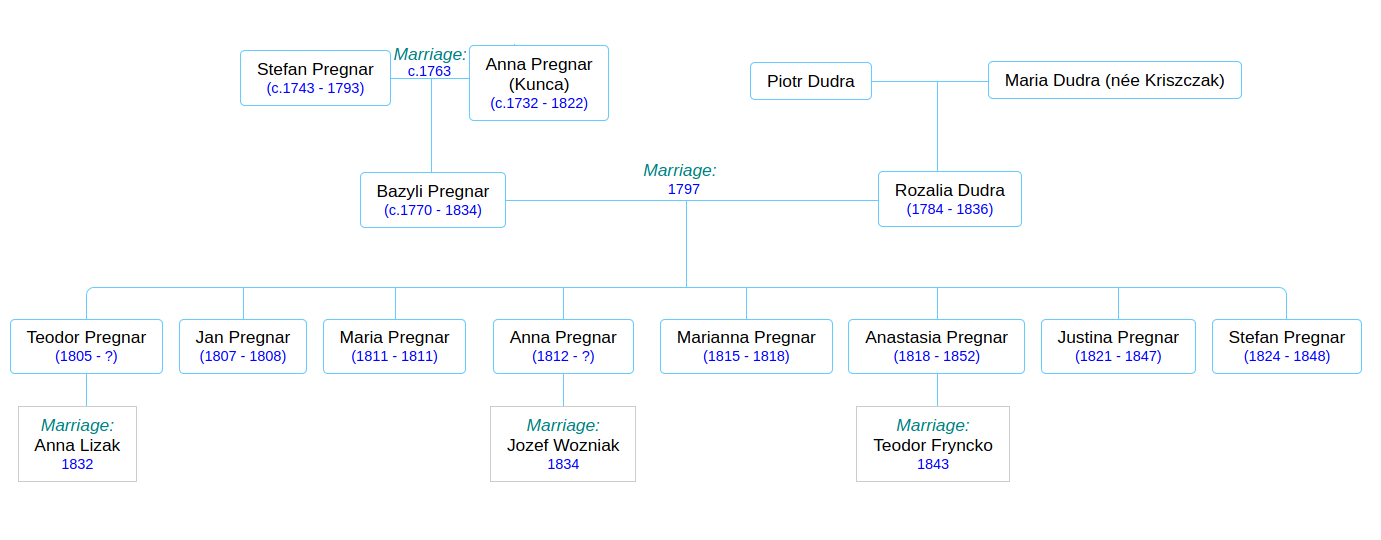
Within a few years (1797) the late Stefan’s eldest son Bazyli (my great-great-great-great grandfather) will marry Rozalia, the 14-year-old daughter of his neighbor Piotr Dudra. Basyli’s little brother Szymon (or is Szymon really his nephew??) will move out of House 40 in 1808 and move in with the parents of his new bride, Pelagia Dudra, who is possibly a cousin of Rozalia. They will start a new branch of the Pregnar family, which I won’t deal with here.
I found it interesting that Bazyli and Rozalia did not start having children until 8 years after their marriage, when Rozalia would have been 22 years old. Perhaps this custom was out of consideration for her tender years? Anyway, between 1805 and 1824 Bazyli and Rozalia had 8 children, 5 of them surviving childhood. At its busiest in 1822 the house was home to at least 9 people: Bazyli and Rozalia and their children Teodor, Justina, Anna, and Anastasia; Bazyli’s sisters Anna and Anastasia, and his aging mother Anna. You get the impression that Anna was a favorite name in the Pregnar family in these years.
Anna the elderly family matriarch (you remember Anna… who watched her mother and Grzegorz Mizik shamble off towards Wapienne some 40 years ago…) passed away that year (1822) at the age of 90, and her maiden daughters Anna and Anastasia followed her a little later. It’s kind of humbling to think of the continuity that the elder Anna must have represented in that household. She was (probably) born in that house and lived in it all her life, watched her children grow up and move out, and, in some cases, die before her. She did her best to protect her daughters from scandal. By the time she died, her eldest son Bazyli was approaching his old age and her 17-year-old grandson Teodor would have been assuming more responsibility for the farm.
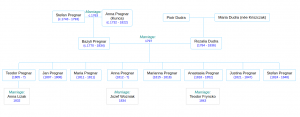
Pregnar family tree. Bazyli and Rozalia’s generation.
The end of the 18th century and first decades of the 19th were increasingly tumultuous years for Galicia. The Third Partition of Poland finally wiped the last remnants of the Polish-Lithuanian Commonwealth off the map of Europe, and Galicia absorbed more of the formerly Polish lands. Galicia became a magnet for Polish aristocrats and intellectuals from other Polish areas, who believed that the relatively liberal attitudes of the Austrian Hapsburgs made Galicia a good place from which to launch a Polish independence movement. The Austrians, for their part, tried to rule their Galician province with an enlightened fist, granting Galicia its own provincial legislature, with very limited powers and being dominated by Polish landowners, and not at all responsive to the interests of the peasants. The Austrians did, however, attempt to mollify the serfs by granting them certain freedoms, giving them, for instance, the right to defend themselves in court against the landlords. Except for the the limited rights granted to the serfs, none of these matters would have had much impact on the Ruthenian farmers of Rozdziele.
After his grandmother Anna died, Teodor waited a fairly long time to get married– he was 27 years old when, in February of 1832, he married 15-year-old Anna Lizak, the daughter of his neighbor Maximilian. Like his parents, Teodor and Anna waited a few years before they started having children. Alas, they waited too long, because old Bazyli died six months before the birth of his first grandchild, who was named Bazyli in his honor. And then, Teodor became the master of House 40.
Let’s take a close look at the timeline of the growing family of this Teodor, old Anna’s grandson, my great-great-great grandfather, because I think it holds the key to… something.
Young Bazyli was born in February of 1835. The next two children were also boys– first Mikołaj (Nicholas) in December of 1836; he died after 2 months (and his grandmother Rozalia died in the springtime before him). Then Daniel was born around Christmastime 1838; he too lived for two months, then died in February.
I have a notion that Teodor and Anna were starting to feel desperate. So much death in such a brief span of time, and now, no elders to turn to for guidance. Lives of such devotion and hard work, punctuated by so much sorrow.
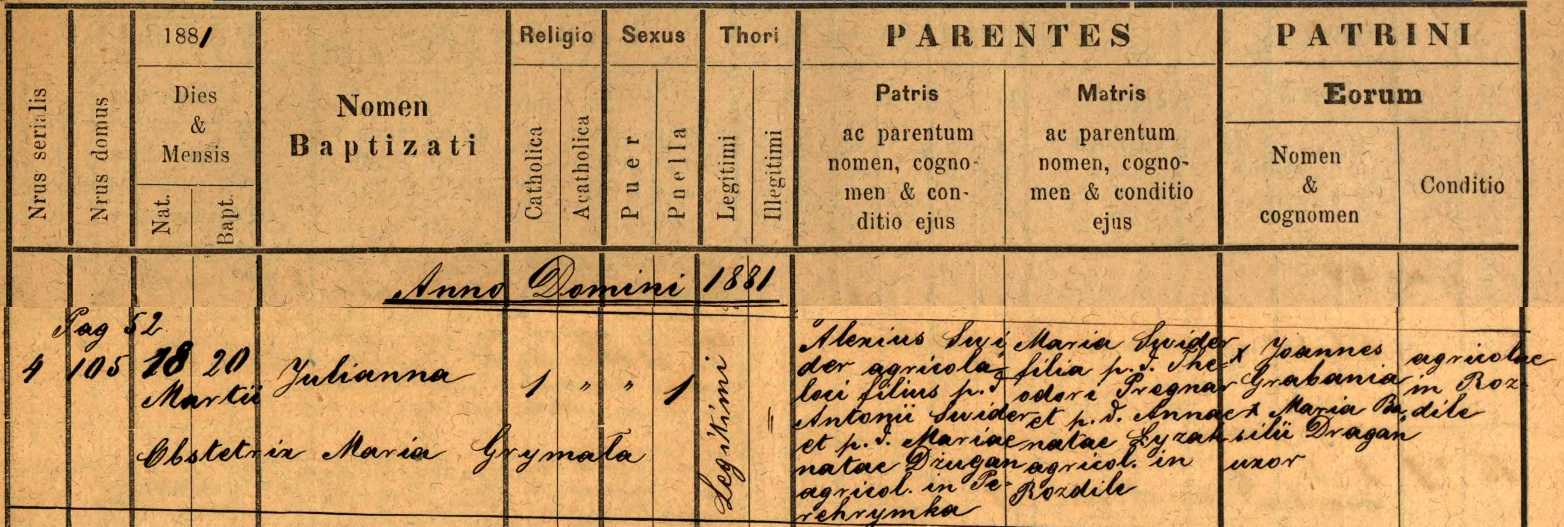
Then, less than a year after Daniel’s death, a daughter was born, Maria, in early January, 1840.
I believe this is significant. Maria was not, up to this point, a common name in the branch of the Pregnar family that we have been chronicling here, although it was very common in other Rozdziele families at the time. Was this child, Maria, an answer to fervent prayers the family had offered to the Blessed Virgin at the church down the road? Perhaps, but I have another theory, which I’ll get to eventually.
Before we breath a sigh of relief and rejoice in the power of prayer, I have some bad news. Little Maria lived for 17 months, and died in June of 1841. Her cause of death was listed as Naturalis, “natural causes.” I can’t imagine Teodor and Anna thought there was anything natural about it.
Teodor and Anna wasted no time. On January 20, 1842, another daughter was born! She, too, was named Maria. And I invite you to do the math– this Maria was born at least 2 months prematurely, so the odds of survival were stacked against her. Plus, wintertime is a bad time for a baby to be born on the farm, with the next harvest so far off. And believe me, there were going to be some dark years ahead.
The years 1847-48 took a terrible toll on the family. Teodor and Anna’s newborn daughter Rozalia died, as did Teodor’s unmarried siblings remaining in the house, Justina (26) and Stefan (24). Anna’s father Maximilian Lizak died, along with her older brother Jan. Teodor’s sister Anna had previously married into the Wozniak household, where there were at least 3 deaths during this time, and another sister, Anastasia, witnessed at least 5 deaths in the Fryncko household. Things looked grim for little Maria #2, for these were years of cholera.
The Third Cholera Pandemic, that started in 1846, spread across the globe and would take hundreds of thousands, perhaps millions of lives. It saw the birth of the science of epidemiology and the discovery that the cause of the disease was germ-infested water rather than “miasma” or bad air. In addition to the disease wreacking a terrible toll in Galicia in 1847-48, 1847 was also a year of famine due to the destruction of food stores during the Galician Slaughter in 1846. The parish death registers in those years tell many a heart-breaking tale.
It’s crazy to claim you think you know people you never met, who died over a century before you were born, who left no written or photographic artifacts, and who inhabited a completely unknown and foreign cultural milieu. But I’d like to say that I think I have gotten to know this Teodor and his wife and grandmother, at least a little bit. Because now, I’d like to show you where I think House 40 stood, and what I think that means.
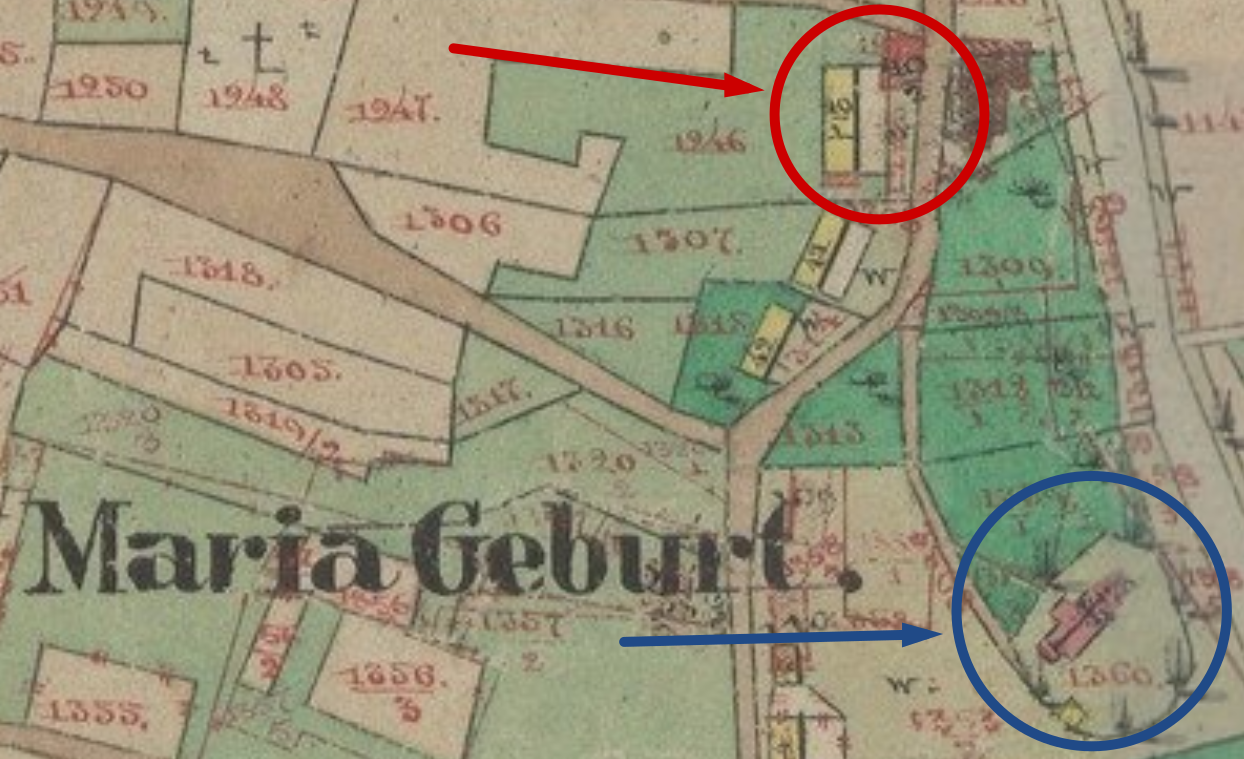
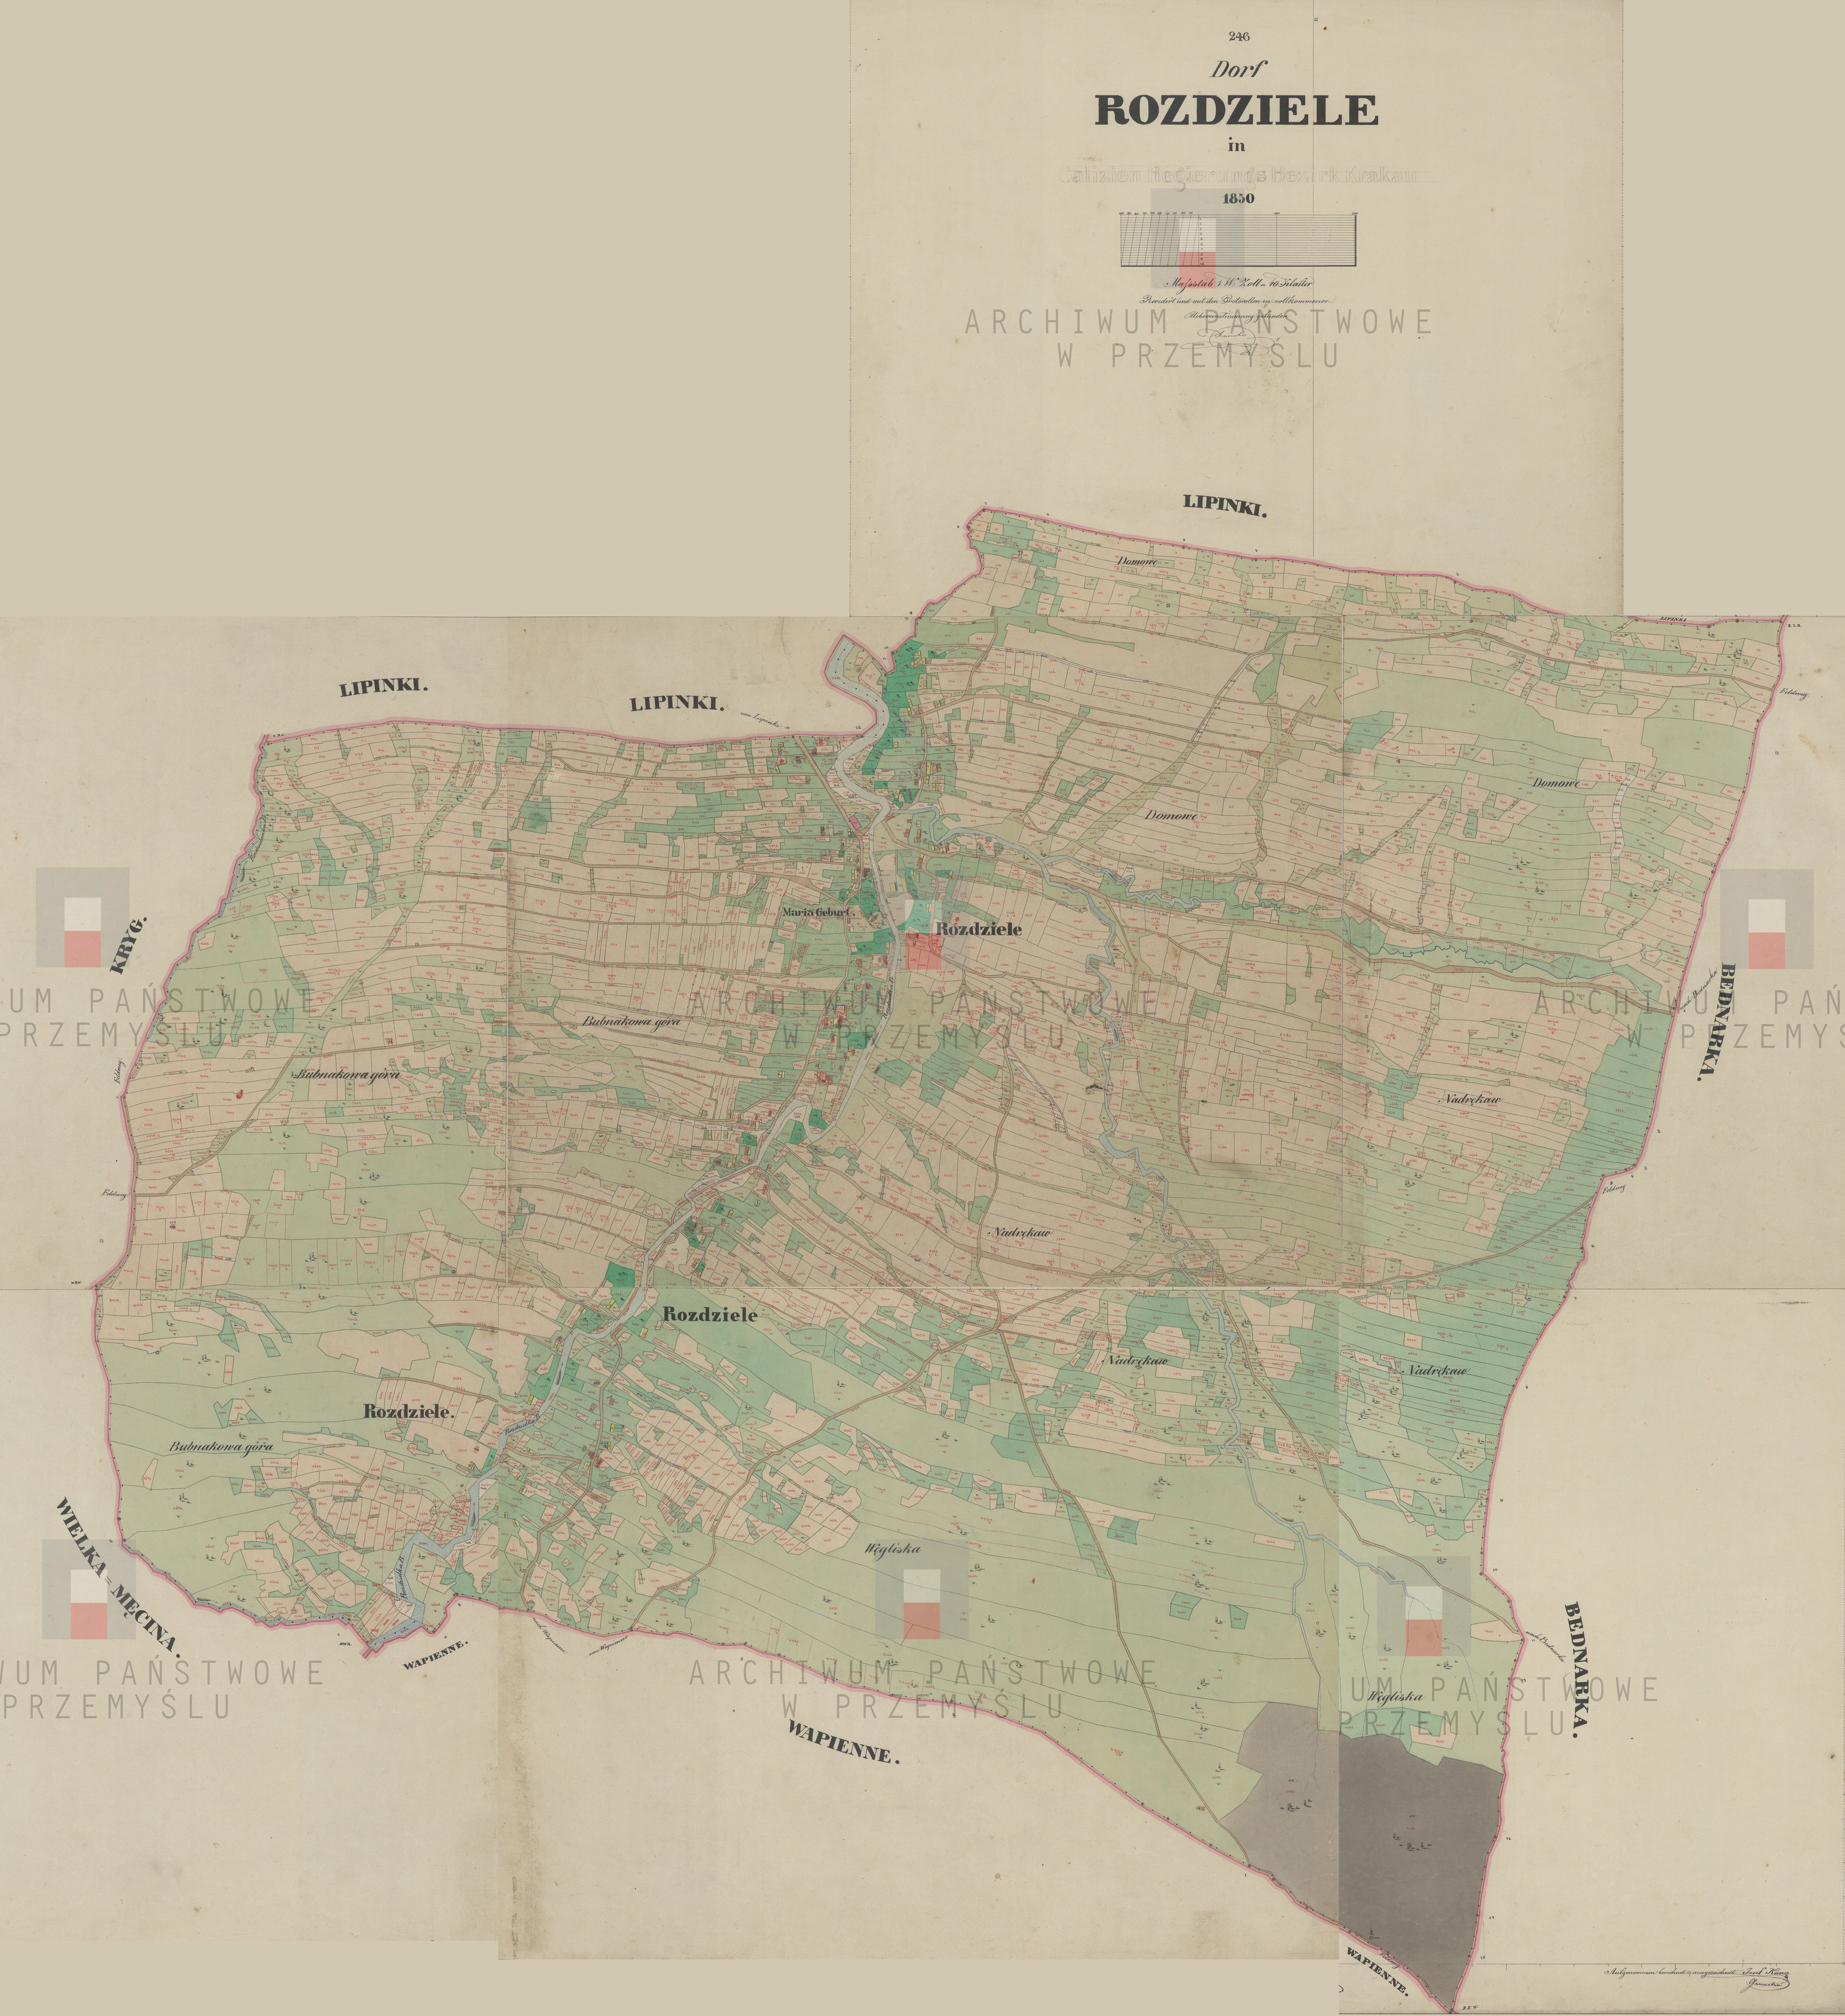
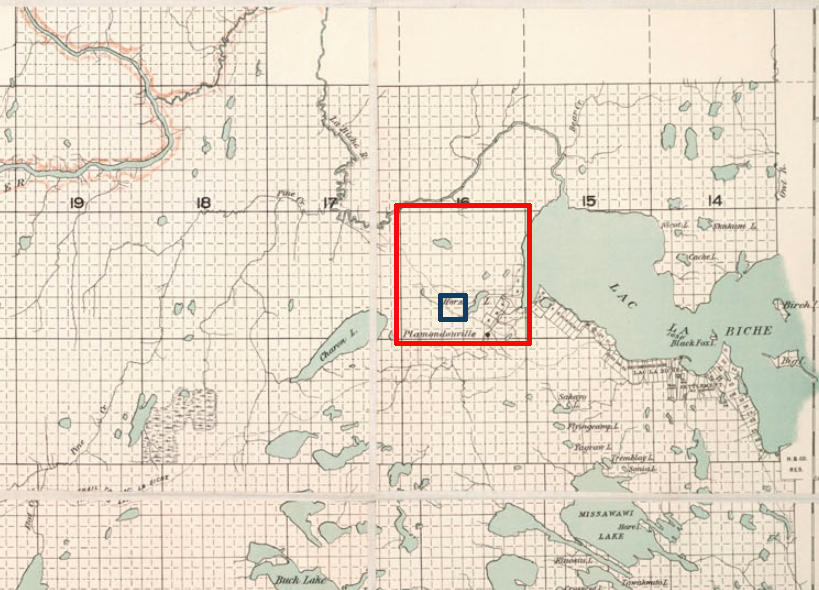
Here is the heart of the village on the official 1850 Austrian land survey map of Rozdziele. The church of Maria Geburt, dedicated in 1785, is there in the blue circle. And there, less than 200 metres to the north, are two structures labelled 40/1 (yellow rectangle) and 40/2 (pink rectangle). This complex of buildings, I am reasonably sure, is House 40, whereof we speak.

House 40 and Maria Geburt (Church of the Nativity of the Blessed Virgin)
And here, if you care to get a bird’s eye view of the entire village, are all the parts of the survey map, knitted together. (You can also download the whole thing from The Polish National Archives here).
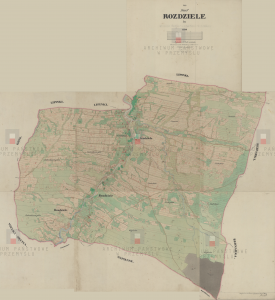
Map of the village of Rozdziele in Galicia in the Jasiel region (1850). Source: Polish National Archives in Przemyl
I’m going to lapse into speculation here, and suggest that the proximity of House 40 to that church had an impact on the family’s trajectory. I suggest that the elder family matriarch Anna Pregnar Kunca, who watched that church being built and who lived, grew old, and died a stone’s throw away, was a very devout woman. If I’m correct about Jan, Michał, and Szymon being, not her own children, but the children of her daughters whom she was protecting, then that suggests she had a rapport with the record-keeping priests, who must have raised a question or two when an elderly woman showed up with newborn babies for baptism, and that somehow, she had the power to quiet their doubts.
I’ll go further and suggest that her grandson Teodor adored her and was equally devout, and that she urged (or commanded) him to name his first daughter Maria, in honor of the patron saint of her beloved church, to which she owed so much. Somehow, Teodor got it into his head that having a girl named Maria in the house was very important, which is why, 7 months after the death of his first daughter Maria, he named his second daughter with that same name. The survival of that second girl named Maria must have held an outsized importance in the minds of her parents, during those years when the Pregnar family– indeed, all the families of Rozdziele– were suffering terrible hardship.
It is surely no accident that the best map we have of Rozdziele was created in 1850, on account of the weighty events of the preceding few years. 1846 saw a period of massive civil unrest known as the Galician Slaughter, a two-month period in which serfs rose up against their landlords and massacred them. This brief “peasant war” was centered on the town of Tarnów, some 50 km north of Rozdziele. Historians generally believe that is was mostly the Polish-speaking serfs who were behind the slaughter, rather than the Ukrainian-speaking Ruthenians. I have so far discovered no mention of Rozdziele in written accounts of the uprising, although you can bet it must have been a hot topic of conversation amongst the villagers.
And then, as you may recall from history class, 1848 was the famous “Year of Revolutions”. It was the year of Marx and Engels and the Communist Manifesto; revolutions and uprisings swept across Europe, and the Austrian Empire was no exception. The governor of Galicia, fearing a repeat of the violence of two years past, took matters into his own hands and unilaterally abolished the institution of serfdom within the borders of his province. This made the Polish landlords furious, and it caught the Emperor in Vienna off-guard too, though he ultimately decided it was a good idea and instructed the Imperial Parliament to ratify the Emancipation retroactively. Thus Galicia came to have the distinction of being the first part of the Austrian Empire to free the serfs.
So the purpose of this map, finished two years after the Emancipation, was to lay out in detail the land that each peasant held a legal claim to.
By now you might be wondering what ever happened to Maria #2, the frail premature baby with poor prospects for survival…
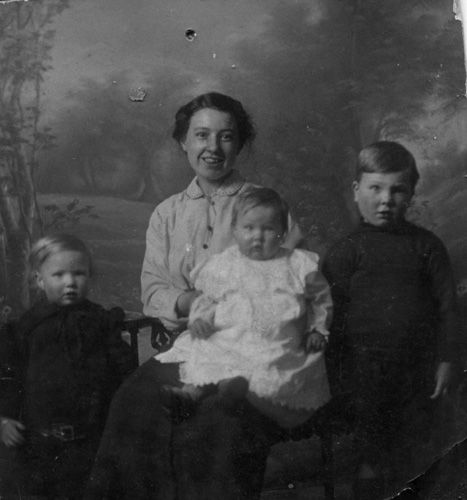
Guess what? Maria #2 lived through all those years of famine and disease and social upheaval. She grew up to become my great-great-grandmother, Maria Bubniak-Świder-Pregnar, the mother of Julia Swedish who went across the Big Water to Canada. Maria’s house was large. I’ll tell the story of that house in Part 2.
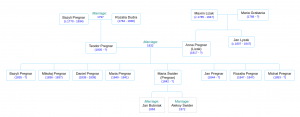
Pregnar family tree.
Teodor and Anna’s generation.
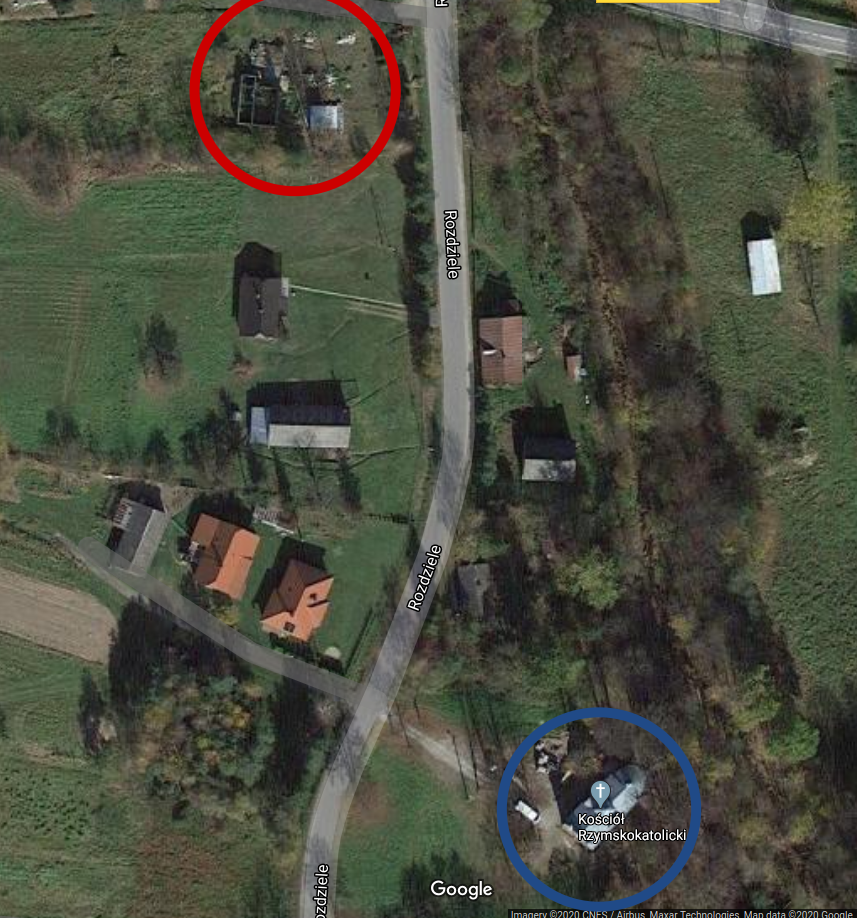
The Church of the Nativity of the Blessed Virgin is still standing, by the way. Here are some modern-day photos of it. And here is a recent satellite photo of the neighborhood, which you can compare to the 1850 Austrian survey map. The blue circle is the church, and the red circle… is a collection of roofless, partially-collapsed buildings that stand on the site of the old House 40 complex. It’s deliciously tempting to imagine that this might be the remnant of the 18th-century building where Anna Kunca grew up, raised her children, and formed her views of the world…
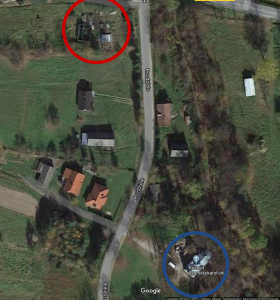
Image copyright Google 2020. Retrieved on July 15, 2020.